Bonjour
J'essaye de paramétrer un VPN Surfshark sur mon Nas mais impossible de le faire fonctionner, c'est vrai que je suis pas doué sur les Nas.
Je suis sur une version 4.3.6.0923
J'ai téléchargé sur mon compte les fichiers .ovpn en tcp et udp, dans qvpn service 2 j'ai ajouté les 2 profils de connexion (je ne connais pas la diffrénce des 2) c'est pour utiliser rtorrent en toute securité.
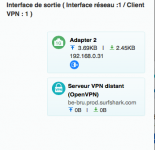
dans les paramètres réseau j'ai sélectionné fr-par.prod.surfshark.com comme passerelle par défaut
et j'ai le message
Adapter 2 a été définie comme passerelle système par défaut car fr-par.prod.surfshark.com ne peut pas accéder au réseau.
Par ailleurs dans qvpn je n'arrive pas a démarrer les 2 profil (j'ai déja reussi il y avait une lumière verte mais a force de toucher a tout :twisted:
surfshark m'a envoyé une procédure de connexion (j'y arrive pas) quelque peu complexe par rapport au différent tuto que j'ai pu trouver pour le paramétrage.
Alors je cris a l'aide, 3 jours que je suis dessus et je m'en sors pas.
Merci a tous
As per your request, we are sending instructions on how to setup QNAP NAS.
Connect to your Qnap control panel:
1. In order to connect your Qnap NAS device to VPN, we will need to access its control panel. The easiest way to do that is using the Qfinder app provided together with Qnap NAS system. Please run the app and wait a few moments for the Qfinder to find the Qnap connected to your local network. A few moments after opening the app it should list your NAS device. Double click on it in the list and its control panel will be opened in your default internet browser.
2. You will now be able to log in to your Qnap control panel.
3. In order to set up the VPN connection, you will need to use your administrator account.
Here is a tutorial on how to connect a QNAP NAS via OpenVPN:
1. We recommend downloading our server configuration files, that you can find here: https://account.surfshark.com/setup/manual
You will be able to download the configuration files, as per the screenshot:
2. Create a second text file with your username and password. We named the file "surfpass.txt". Enter your username in the first line and password in the second line of the file:
Surfshark_Username
Surfshark_Password
Both of them can be found on your profile: https://account.surfshark.com/setup/manual
Make sure to copy them by pressing on the clipboards, as they are each 24 characters long!
Example below:
3. Access your QNAP user interface. Open the File Station on your QNAP, navigate to the /Download/ directory and create a new folder named "VPN" by clicking the "+" sign at the top of the window. You should now move the created downloaded .ovpn file (in our example uk-man.prod.surfshark.com) and surfpass.txt file you have created to this directory.
4. You also need to create another text file called "ca.crt" that has to contain the CA certificate of the server. You can copy the same certificate as used in the .ovpn configuration file.
5. Access your QNAP user interface again and go to Control Panel -> Applications -> VPN Client.
6. In the VPN Client menu from the "Add" Drop down menu select "OpenVPN".
7. Fill out the OpenVPN client settings:
• Enter "UK SurfsharkVPN" as a Profile Name. You can name the profile however you like, however it is most helpful to name it for the server and settings used;
• Type in the IP address of the server. Which in our case is uk-man.prod.surfshark.com.
• Enter your Surfshark credentials. They are the same as in the 2nd step.
• Change the Encryption to "Highest (AES 256 bit)";
• Enable "Allow other network devices in the same subnet to connect to the VPN through the NAS".
8. You will now need to connect to your QNAP disk station using SSH tunnel. For that, you can use Putty, WinSCP (Windows) or Terminal (Mac OS X, Linux). In our cases, we will be using Putty client for Windows (You can download Putty here ).
In the "Host Name (or IP address)" field enter the local IP address of your QNAP (in our case, 192.168.1.60) and click "Open".
9. Enter the username and password of your QNAP administrator account.
10. Use this command to open the "vpn_openvpn_client.sh" file.
vi /etc/init.d/vpn_openvpn_client.sh
Then press "A".
Important!! Copying the text to the vi editor tends to leave out some of the first characters of the copy-pasted text. You may need to manually type in the missing part of the copied text.
Now you need to change the beginning of this file from
to
Once you complete editing the file press "Esc" and enter this command ":wq". It will save all the changes you have made to the file.
Also, restarting your QNAP disk station will reset all changes made to this file. Therefore, you will need to repeat this step after each QNAP restart to connect to VPN.
11. You can now connect to the VPN using this command:
openvpn --config /share/Download/VPN/uk-man.prod.surfshark.comsurfshark_openvpn_udp.ovpn
12. Executing the command will not generate any message in the Putty window. Therefore, you need to open the openvpn.log file in the /Download/VPN directory to confirm that you got connected to the VPN. The last line of the log file should be "Initialization Sequence Completed"
Let us know how that goes!
All the best,
Sincerely,
Customer Success Shark
J'essaye de paramétrer un VPN Surfshark sur mon Nas mais impossible de le faire fonctionner, c'est vrai que je suis pas doué sur les Nas.
Je suis sur une version 4.3.6.0923
J'ai téléchargé sur mon compte les fichiers .ovpn en tcp et udp, dans qvpn service 2 j'ai ajouté les 2 profils de connexion (je ne connais pas la diffrénce des 2) c'est pour utiliser rtorrent en toute securité.
dans les paramètres réseau j'ai sélectionné fr-par.prod.surfshark.com comme passerelle par défaut
et j'ai le message
Adapter 2 a été définie comme passerelle système par défaut car fr-par.prod.surfshark.com ne peut pas accéder au réseau.
Par ailleurs dans qvpn je n'arrive pas a démarrer les 2 profil (j'ai déja reussi il y avait une lumière verte mais a force de toucher a tout :twisted:
surfshark m'a envoyé une procédure de connexion (j'y arrive pas) quelque peu complexe par rapport au différent tuto que j'ai pu trouver pour le paramétrage.
Alors je cris a l'aide, 3 jours que je suis dessus et je m'en sors pas.
Merci a tous
As per your request, we are sending instructions on how to setup QNAP NAS.
Connect to your Qnap control panel:
1. In order to connect your Qnap NAS device to VPN, we will need to access its control panel. The easiest way to do that is using the Qfinder app provided together with Qnap NAS system. Please run the app and wait a few moments for the Qfinder to find the Qnap connected to your local network. A few moments after opening the app it should list your NAS device. Double click on it in the list and its control panel will be opened in your default internet browser.
2. You will now be able to log in to your Qnap control panel.
3. In order to set up the VPN connection, you will need to use your administrator account.
Here is a tutorial on how to connect a QNAP NAS via OpenVPN:
1. We recommend downloading our server configuration files, that you can find here: https://account.surfshark.com/setup/manual
You will be able to download the configuration files, as per the screenshot:
2. Create a second text file with your username and password. We named the file "surfpass.txt". Enter your username in the first line and password in the second line of the file:
Surfshark_Username
Surfshark_Password
Both of them can be found on your profile: https://account.surfshark.com/setup/manual
Make sure to copy them by pressing on the clipboards, as they are each 24 characters long!
Example below:
3. Access your QNAP user interface. Open the File Station on your QNAP, navigate to the /Download/ directory and create a new folder named "VPN" by clicking the "+" sign at the top of the window. You should now move the created downloaded .ovpn file (in our example uk-man.prod.surfshark.com) and surfpass.txt file you have created to this directory.
4. You also need to create another text file called "ca.crt" that has to contain the CA certificate of the server. You can copy the same certificate as used in the .ovpn configuration file.
5. Access your QNAP user interface again and go to Control Panel -> Applications -> VPN Client.
6. In the VPN Client menu from the "Add" Drop down menu select "OpenVPN".
7. Fill out the OpenVPN client settings:
• Enter "UK SurfsharkVPN" as a Profile Name. You can name the profile however you like, however it is most helpful to name it for the server and settings used;
• Type in the IP address of the server. Which in our case is uk-man.prod.surfshark.com.
• Enter your Surfshark credentials. They are the same as in the 2nd step.
• Change the Encryption to "Highest (AES 256 bit)";
• Enable "Allow other network devices in the same subnet to connect to the VPN through the NAS".
8. You will now need to connect to your QNAP disk station using SSH tunnel. For that, you can use Putty, WinSCP (Windows) or Terminal (Mac OS X, Linux). In our cases, we will be using Putty client for Windows (You can download Putty here ).
In the "Host Name (or IP address)" field enter the local IP address of your QNAP (in our case, 192.168.1.60) and click "Open".
9. Enter the username and password of your QNAP administrator account.
10. Use this command to open the "vpn_openvpn_client.sh" file.
vi /etc/init.d/vpn_openvpn_client.sh
Then press "A".
Important!! Copying the text to the vi editor tends to leave out some of the first characters of the copy-pasted text. You may need to manually type in the missing part of the copied text.
Now you need to change the beginning of this file from
to
Once you complete editing the file press "Esc" and enter this command ":wq". It will save all the changes you have made to the file.
Also, restarting your QNAP disk station will reset all changes made to this file. Therefore, you will need to repeat this step after each QNAP restart to connect to VPN.
11. You can now connect to the VPN using this command:
openvpn --config /share/Download/VPN/uk-man.prod.surfshark.comsurfshark_openvpn_udp.ovpn
12. Executing the command will not generate any message in the Putty window. Therefore, you need to open the openvpn.log file in the /Download/VPN directory to confirm that you got connected to the VPN. The last line of the log file should be "Initialization Sequence Completed"
Let us know how that goes!
All the best,
Sincerely,
Customer Success Shark